Before leaving to start Fixed, I really enjoyed working as an engineer on large RC frame projects and I wanted to convey what a typical day (if there is ever such thing) looks like. I appreciate some of you who may read this may not be from an engineering or construction background, or may have just started down this path (best of luck to you), and as a result may not be familiar with some of the construction jargon that I use, so I have created a glossary of terms at the end of this piece which I hope will be helpful.
As I have already mentioned, there is no such thing as a normal day in construction. Every day throws up new challenges and everyone’s experience of it differs – I can imagine some site engineers reading this and saying – ‘it’s not like that where I work!’. If we ever get a comments section at the end of these blogs, it would be interesting to see what people think – I have no doubt I’d get roasted 🤣. In the meantime, feel free to get in touch with me directly if you have any questions or would like to learn more (henryk@fixedconstruction.co.uk). Here we go…
7.15am
- Arrive at work – Time to have a cup of tea (or coffee if you prefer).7.30am-7.45am
- Time for the first meeting, led by the Senior Construction Manager, attended by senior management, all foremen and engineers. The purpose of the meeting is to outline all the daily tasks, so everyone is aligned in what their responsibilities are for the day. This will usually start with a breakdown for each work area and the primary focus for each foreman. This will be followed by a summary from the Concrete Engineer outlining what elements will be poured on site, the arrival time of the concrete wagons for various areas and the total amount of concrete that has been ordered. The Rebar Engineer and Logistics Manager will then outline what deliveries will come on site and at what times, so crane usage can be planned around that. Any issues that have been presented by the Principal Contractor will be flagged, almost definitely complained about regarding how unreasonable they are and ultimately some kind of solution found. Also, any issues can be raised by anyone in the team or the foremen can raise any issues that their operatives have. This is the time to speak up if you have anything you want to bring to the team’s attention.7.45am
– Engineers’ meeting. Yes, another meeting. The Senior Engineer to lead discussion on what is expected from the team today and key focus areas going forward, aided by the site engineers. Any quality issues or issues on site to be raised and discussed. New drawings and elements specific to the day’s work will be raised and discussed amongst the team so everyone is on the same page, and no-one misses anything. This is the time to raise any engineering specific issues so they can be discussed as a team.**
8.00am
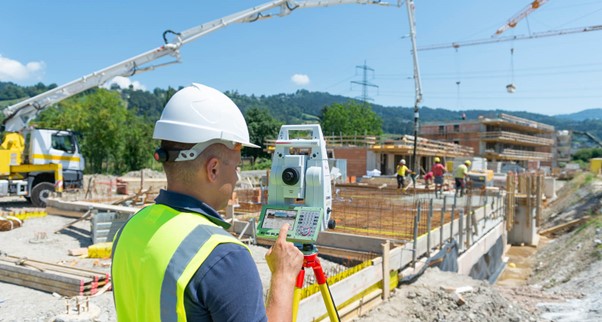
**– It is finally time to collect your engineering equipment and go onto site.The first thing to do will be to speak to the foreman/foremen in that area to confirm what order you are going to do the work. This is important as a lot of the work they do will be dependant on you to provide the information they need to complete the task. You can decide the urgency as they will all say that their work is the most important. Top tip – discuss the daily work plan with each foreman to plan roughly what time they will need certain things done. In this example they had a slab pour the day before and everyone is raring to drop materials on the recently set concrete and start striking the shutters. First thing will be to survey the slab before they have completely covered it. Most likely the foreman will be already pestering you to mark something, but this is the most important thing for you to make your life easier later on. After that is done and the information stored on your EDM, which shouldn’t take too long, you can start marking out various elements on the slab, such as the columns and walls. For columns you will mark out two lines usually the outside edges, although sometimes foremen prefer you to mark the centrelines. I would be careful doing this as you are assuming the carpenters know the size of the column! Never trust the carpenter, it is your responsibility to make sure the columns are made the correct size! The clearest way to do this is to use Tipex to mark the points, yellow spray paint and a red or blue chalk line (as long as you are not working on a finished surface). This will make it nice and clear for the carpenters to see the line and place the shutter on its edge. It will also cover you if there is an error or the column is twisted as you will clearly see your mark after the pour.
Next you get a call from the decking foreman, that part of the deck is open and ready for marking. Before you start, you use the levelling laser to check the level of the deck is correct before marking anything. You set your laser off a datum and do some spot checks. If there are any discrepancies, then get the carpenters to make it right. When you are satisfied with the level, up you go onto the deck. Make sure you stay within the edge protection and never go on a deck which is not fully protected, it doesn’t matter if the foreman is shouting that he needs this and that, your safety is the most important and remember most accidents in the workplace come from falls from height. If the deck is safe, take your survey pod up and set it up on a donkey dick (yes that is what they are called! I don’t recommend Googling it!). Now you can start to mark out the slab edge and any boxes or elements that will be fixed into the slab such as fire collars or voids. Always try and mark these before they start fixing as it is so much easier when you don’t have a ton of rebar in the way! Make large clear marks, using either Tipex or a carpenter’s pencil. If it is raining, then use the pencil. Before you know it, it is 11am and time for your first break.
11.30am – 2.45pm
– The slab is marked and the deck is marked, you are on top of things and no-one’s work is being held up - you are doing a good job. As you go back on site, you see that the fixers have almost finished the top mat of a slab in a different area. You pre-empt the call from the foreman and head over to mark out the starter bars for the columns and walls on the rebar. Again, use Tipex for this. I would always mark the centre of the wall or column on the steel as they can tell the thickness of the wall or column from the schedule. Whether you mark the centre or the edge, be consistent so they always know what to expect! You proceed to mark the columns and wall out. You have finished marking and the fixers have started fixing the starter bars. You cross check the GA drawing and the RC drawing and notice a discrepancy between the two! Immediately you notify the Fixer Foreman to stop work and make a call to the senior engineer to determine which one is correct. It turns out the GA supersedes the rebar drawing; you tell the fixer that the columns are wider than anticipated and he must move the starter bars to suit. After a blast of choice words from the foreman and the quiet grumbling of the fixers, they start to change it. You are annoyed because you spotted the error late, even though it that wasn’t your fault, everyone is angry at you because you created more work for them. At least you spotted it, you make a mental note to bring that up in the morning briefing the next day, so that this can be avoided in the future and an RFI can be issued by the Senior Engineer for the latest drawing. This takes you through to your final break for the day.3.15pm-5.15pm
– You go back to the slab with the starter bar issues, you have just been told they are pouring it first thing tomorrow, so you have to check that all elements are in the right place. This means collecting data for the pre-pours. You as-built the slab edge and any cast-in elements in the slab e.g., fire collars and ancon channels. After you have collected the data, you leave your assistant on site to manage any issues or setting out that the foreman requires. You need to draw up the as-builts before the end of the day. You head off to the office and jump on the laptop and switch on AutoCAD. You plot the data and notice that one fire collar is missing! This is why you do the as-built to catch these before the concrete is in place! Everything else is within tolerance so you call your assistant and tell him what area to set up in. You take the Prism on the way to site as you know you won’t be able to see the deck directly. You quickly mark it and tell the carpenters they have missed an opening. The carpenters cut a space in the rebar with a petrol saw and install the fire collar, the fixers then fix rebar around the new opening as per the detail. The QA engineer can now check the slab. Your job is done, just in time and you start taking your equipment back to the store.5.15pm-5.35pm
– Get changed and clock out – another day in the bag.While I’ve tried here to get across what a typical day looks like for an engineer. The reality is that every day is different. This is one of the things I enjoyed most about the role. You’re working with lots of different people and face daily challenges that keep you on your toes and problem solving. People will come to you to for solutions, so it can be very rewarding in that sense. And finally, you are building something real and tangible and you get to see all your work coming together each day.
Glossary
Ancon channel – is a type of steel channel that is used to connect concrete structures to external elements, they are typically used in conjunction with wall ties, which are metal rods or wires that help to hold the masonry or cladding of a building in place. The channels are typically installed horizontally at regular intervals along the length of the wall, and the wall ties are inserted into the channels and secured in place.

As-builts – refers to documents that compare the contrast between designed and final specifications. It is how the building has been built, hence ‘as-built’. As-builts may include a variety of information, such as the exact location and dimensions of structural elements, drainage, services, etc. Pre-pour as-builts or to use a more appropriate word ‘pre-pour surveys’ are as implied, done before the element is cast with concrete. This allows the engineer to check that everything is installed as per the drawing before it is too late.
AutoCad – is a computer-aided design software program used in construction for creating detailed drawings and technical illustrations. AutoCAD allows architects, engineers, and other construction professionals to create precise and accurate 2D and 3D models of buildings and structures, including floor plans, elevations, and sections.
**Cast-in elements **– refer to prefabricated building components that are cast into concrete structures during construction. Cast-in elements are designed to be embedded within the concrete, providing a secure and reliable connection to the structure. Examples of cast-in elements include steel plates, threaded rods, anchors, etc.
Concrete Engineer – The primary role of a concrete engineer is to design and specify the concrete mix for a particular project, taking into account factors such as the desired strength, durability, and workability of the concrete. They are also responsible for ordering all concrete to site and ensuring that it is checked and to specification before it is poured.
Decking – refers to a temporary support structure specific to supporting a slab.

Donkey Dick – a cast-in sleeve or "donkey dick" is a short length of steel pipe that is embedded in concrete during the construction process. In this case cast-in sleeves are used to provide a means of placing in a Survipod™, allowing the engineer to use their equipment.

**EDM (Electronic Distance Measurer) **– refers to an instrument that accurately measure distances, angles, and elevations on construction sites. EDM instruments typically use a laser or infrared beam to measure distances between two points on a construction site. The instrument sends out a beam of light, which reflects off a target placed on the second point. The instrument then calculates the distance based on the time it takes for the light to travel to the target and back. The technology is highly accurate and allows for precise measurements to be taken quickly and efficiently.

Falsework – refers to a temporary support structure used to hold a permanent structure in place during construction. Falsework is typically made from steel or timber and is designed to provide temporary support for the structure until it is able to support itself.

Fire collar – is a type of passive fire protection system that is used to prevent the spread of fire and smoke through penetrations in fire-rated walls, floors, and ceilings. Fire collars are typically made from fire-resistant materials, such as intumescent materials or metal, and are designed to fit around pipes or cables that pass through fire-rated walls or other fire-resistant barriers. When exposed to high temperatures or flames, the fire collar expands and seals the opening around the pipe or cable, creating a barrier that prevents the spread of fire and smoke.

Formwork/shutters – refers to temporary structures used to support and mould concrete into a specific shape during construction. Formwork and shutters are typically made from timber, steel, or other materials, and are designed to withstand the weight and stresses of the construction process while holding the concrete in place until it has hardened and can support itself. They are typically used in the construction of walls, columns, beams, lift shafts, etc. Once the concrete has set and cured, the formwork and shutters can be removed and dismantled (this process is called striking), leaving only the finished concrete structure in place.

GA drawing – refers to a general arrangement drawing, which is a type of technical drawing that shows the overall layout and design of a building or structure. A GA drawing typically includes a number of elements, such as the dimensions and shape of the building or structure, the location of voids, and other features, and details on the positioning and layout of major structural elements such as columns and beams. The drawing may also include information on the materials and finishes to be used in the construction of the building, as well as any other special features or requirements of the design.
Mark/marking – see setting out.

Petrol saw – refers to a portable cutting tool that uses a petrol engine to power a rotating blade for cutting a variety of materials.

Pre-pours – see as-built.
Prism – refers to a type of reflector that is used to reflect the EDM signal back to the instrument. The prism is typically mounted on a handheld pole or tripod that is placed at a specific location on a construction site.

QA Engineer –The primary role of the quality assurance engineer is to monitor and evaluate the quality of construction work throughout the project lifecycle. This includes conducting inspections, audits, and tests to verify that work is being carried out according to the project plans and specifications. The QA engineer is also responsible for identifying any defects, non-conformities, or other issues, and working with the project team to develop and implement corrective actions. They may also be responsible for managing documentation and record-keeping related to quality control and quality assurance activities. This includes maintaining project logs, inspection reports, and other documentation that is required to demonstrate compliance with regulatory requirements and project specifications.
RC Drawing – refers to a reinforced concrete drawing, which is a detailed illustration that shows the layout and dimensions of rebar in a reinforced concrete structure. A RC drawing typically includes a number of elements, such as the dimensions of the structure, the location and spacing of reinforcing steel bars (rebar), and details on the placement and installation of the rebar within the concrete formwork.
Rebar – is short for ‘reinforcing bar’. It is steel that is used in reinforced concrete to provide additional strength and support to the structure.

Rebar detail – refers to an arrangement of rebar around an element e.g. a void. It provides additional structural strength to specific areas that require it - not sure about the health & safety standards in the picture!

Rebar Engineer – The primary role of a rebar engineer is to calculate rebar tonnage and place rebar orders for specific sections of work based on the programme using the information from the RC drawings. This may involve determining the total length and number of each type of rebar required, as well as any special shapes or configurations needed.
Setting out – setting out refers to the process of marking the position and layout of a building or civil engineering works on the ground before construction begins. This is typically done using a combination of surveying techniques and construction drawings to ensure that the building or structure is built in the correct location and to the correct dimensions.

Slab pour – a slab pour refers to the process of pouring and finishing a concrete slab as part of a building or civil engineering project. A concrete slab is a flat, horizontal structure that is typically used as a foundation or base for other building elements, such as walls or columns.

Slab-edge – the term "slab edge" refers to the perimeter or boundary of a concrete slab. The edge of the slab may be formed by the installation of formwork to create a defined shape.

Starter bars – starter bars are steel bars that are used to connect reinforced concrete structures together. They are typically installed at the base of a structure, where the concrete slab or foundation meets the wall or column and are embedded into the concrete to provide a secure and reliable connection. The primary function of starter bars is to provide a means of transferring the loads and stresses between different elements of the structure, such as the foundation and the walls or columns. Starter bars are typically made from high strength steel and are available in a variety of sizes and lengths to accommodate different construction requirements. Ensuring that starter bars are properly installed is critical to the overall strength and stability of the structure. Any defects or imperfections in the installation of starter bars can compromise the structural integrity of the building and may require costly repairs or remediation.

Steel fixer / fixer – a steel fixer is a skilled tradesperson who is responsible for installing and fixing reinforcing steel bars (rebar) within concrete structures. Steel fixers work on a wide range of construction projects, including buildings, bridges, tunnels, and other structures. The primary role of a steel fixer is to read and interpret construction drawings and specifications to determine the size, shape, and layout of the rebar required for the project. They are then responsible for cutting, bending, and shaping the rebar to fit the specific requirements of the project, using specialized tools and equipment such as rebar cutters, benders, and tying guns. Once the rebar has been prepared, the steel fixer is responsible for placing and securing it within the concrete formwork, using wire ties or other methods to hold the rebar in place.
**Striking **– refers to the process of removing formwork or falsework from a concrete structure once the concrete has set and cured. Formwork is the temporary structure that is used to support the concrete during the pouring and curing process and is typically made from wood or metal.
Survipod™ – is a setting out tool which replaces the conventional tripod. It acts as a stable platform in areas where a conventional tripod cannot be placed. The Survipod is dropped into a cast in sleeve (donkey dick), which has been cast into a column or wall on the structure. The Engineers instrument can then be placed and screwed onto the top of it.

Top mat – a top mat is a layer of reinforcing steel bars (rebar) that is placed near the top surface of a concrete slab or other concrete structure.